Sommaire
| Key points | Details to remember |
|---|---|
| 🔧 Definition | Drywall ceiling installation: assembly of a framework and fixing plasterboard sheets. |
| 📐 Alignment | Check level and layout before installing the rails. |
| 🪛 Fixings | Screws and anchors adapted according to the support and weight. |
| ✂️ Cuttings | Measure twice, allow gaps and clean cuts. |
| 🧰 Finishes | Tapes and coatings applied in appropriate layers for durability and aesthetics. |
| ⚠️ Common mistakes | Poor layout, insufficient framework, poorly treated joints. |
Installing a drywall ceiling seems simple at first glance: rails, sheets, a few screws. In reality, small mistakes — often invisible at first — cause sagging, cracks, and insulation defects. Here you will find a practical guide focused on mistakes to avoid when installing drywall ceilings, with concrete advice, a technical table, checklists, and a detailed FAQ. The goal: to ensure your ceiling lasts over time, looks neat, and complies with professional standards.
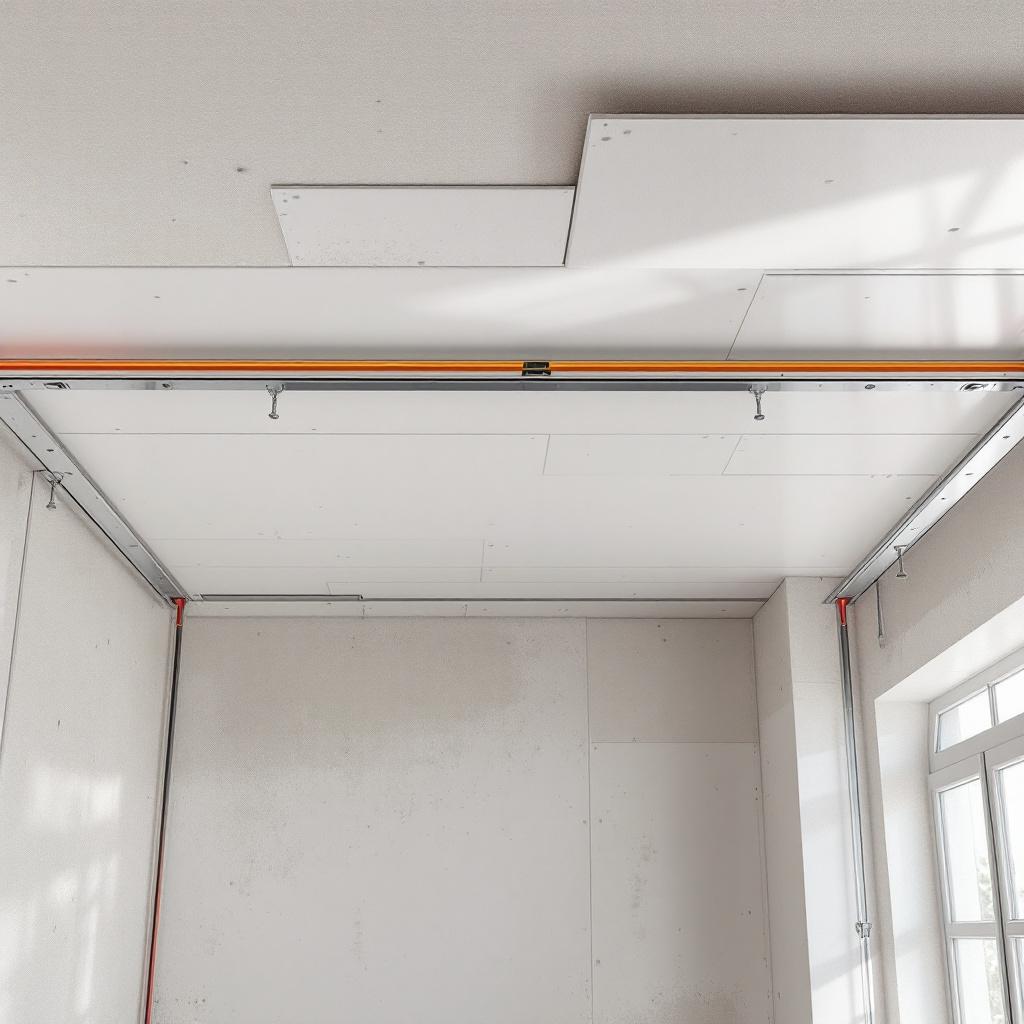
Alignment: mastering flatness from the start
Why alignment conditions everything
A straight ceiling starts with good marking. If a single point of the framework is misplaced, the eye catches the error across the entire surface. One might think a skim coat can fix it; in reality, correcting a misaligned framework costs more in time and materials. Before any fixing, use a laser level or plumb line and mark heights at various points. The layout, meaning the distribution of sheets on the surface, must anticipate joints to avoid random alignments.
Avoiding layout errors
Common oversights: not checking the flatness of the support, installing rails on a wrong axis, or neglecting clearances around technical elements (ventilation, lighting). These faults cause mechanical stresses on the sheets, resulting in cracks or bulges. Take time to draw a grid on the floor or directly on the ceiling to visualize rail and crossbeam placement. This is a 30 to 60-minute investment that prevents lengthy rework later.
Recommended techniques and benchmarks
For a standard ceiling, follow these steps: 1) measure the average height, 2) fix hangers every 60 cm in standard zones, 3) secure perimeter rails on the reference line. Use adjustable hangers to fine-tune flatness room by room. In humid or wide-span areas, reduce hanger spacing to 40 cm. Anticipate false ceiling joints to avoid joints in the middle of a light or ventilation outlet.
“A successful installation depends on the precision of the layout and the regularity of the hangers: a 3 mm gap over several meters is noticeable.”
CSTB Technician – Installation Guide, 2019
Fixings: adapting screws and anchors to the support
Choosing the right screws
Drywall screws are not universal. For ceilings, favor self-drilling drywall screws 35 mm to 45 mm depending on sheet thickness and framework, with trumpet heads to pull the sheet without damage. On metal frameworks, use screws specific for galvanized steel; on wood, use wood screws. Avoid screws that are too long that pierce through the sheet or screws too short that leave play: both cause movement, leading to cracks.
Anchoring and fixing to existing support
When the ceiling is against a load-bearing element (concrete slab, wooden beams), fixing the framework to the support requires the right type of anchor. For concrete, use expansion anchors or threaded rods with chemical bonding for heavy loads. On hollow materials, prefer suitable anchors like molly bolts or toggle anchors. The choice depends on the nature of the support and the load (heavy lighting, insulation, suspended false ceiling).
| Support type | Recommended fixing | Hanger spacing |
|---|---|---|
| Solid concrete | Threaded rod + chemical bonding | 40-60 cm |
| Wood beams | Wood screws + bracket | 40-60 cm |
| Hollow core slab | Plastic or metal anchor | 40-60 cm |
| Hollow wall | Molly bolt | 40-50 cm |
Mechanical mistakes to avoid
Typical problems: loose screws, over-tightened screws causing the plasterboard paper to burst, insufficient hangers, or poorly installed anchors. A screw not fully driven in can create a hard spot where jointing cracks. Inspect each fixing and apply consistent screwing effort; the sheet must be flush without being recessed. For large ceilings, distribute loads by doubling fixing points under support zones (e.g., through joists).
“The durability of a ceiling depends as much on the quality of fixings as on the precision of the framework.”
Patrice Morel, AFPA Trainer, 22 years in roofing and plastering
Cuttings: clean cuts and managing technical entries
Precise measurements and sheet layout
Cutting means planning. Each sheet must fit without tension. Measure twice, mark cuts, and allow 5 to 10 mm gap on edges for expansion and peripheral tape application. For large surfaces, start cuts on the edge opposite to the support direction to avoid breakage and ease handling. Poor layout leads to many cuts, more joints, and thus a more fragile finish.
Clean cuts for lighting and ducts
Passages for spotlights, ventilation outlets, or ducts require precise cuts and reinforcements. Use a hole saw for circular holes or a jigsaw with a fine blade for shapes, marking the position of the support frame. Provide reinforcements around large cutouts: a single cut sheet loses rigidity. Strengthen with battens or strips to ensure perimeter support and prevent buckling between fixings.
- Measure twice: validate side to side.
- Allow gap: 5-10 mm for expansion.
- Reinforcements: around technical cutouts.
- Protection: cut edge should be soft and without splinters.
Common mistakes and consequences
Drilling too large a hole, neglecting proper filling, or cutting flush without reinforcement causes deformations and weak points. Mistakes show as cracks at spot locations, and sometimes partial fall of poorly supported sheets. Last-minute adjustments without layout cause joints aligned on supports, which should be avoided to limit cracks.
“An irregular cut angle weakens the sheet and multiplies skim coat repairs.”
CSTB Technical Study, 2018
Finishes: tapes, coatings, and crack prevention
Proper joint preparation
Finishing is not just smoothing a coating. Tape application, primer quality, and coating technique determine longevity. Apply a first bonding coat, place the tape correctly (avoid bubbles), then apply two passes of finishing and smoothing coats refining the grain. Let each layer dry according to temperature and humidity: poorly dried coating cracks.
Suitable materials and tools
Use reinforced tape for stressed joints, and paper or fiber tape for standard joints. Prefer coatings with anti-crack additives in movement zones. A trowel, float, and wide knife (40 cm) improve flatness and reduce marks. Light sanding after drying with fine abrasive is enough; avoid aggressive sanding exposing the plasterboard paper.
| Element | Recommended product | Practical advice |
|---|---|---|
| Tape | Paper or fiber 50 mm | Apply wet and smooth with trowel |
| Coating | Standard joint compound + finishing | Minimum 2 passes |
| Primer | Bonding primer | Before coating on dusty surfaces |
Avoid visible defects after painting
Visible defects after painting include poorly recessed screws, excess coating, or poorly applied tape. Apply a primer coat to reveal all imperfections before final paint. If microcracks appear after the first paint, do not repaint immediately: sand locally, apply touch-up coating, and let dry. For transitions between different materials (sheet/sheet, sheet/wood), provide painted expansion joints or cover profiles for aesthetics and controlled movement.
“Good jointing largely compensates for slight framework imperfections, but does not correct a poorly installed structure.”
Jean-Pierre Durand, drywall installer trainer, AFPA
Practical checklist: prepare each step
Before starting, here is an actionable checklist to follow point by point. It prevents oversights and guides you for a clean installation.
- Check flatness: use laser level and mark.
- Layout: draw sheet distribution.
- Choose screws and anchors adapted to support.
- Install hangers at correct spacing.
- Reinforce cutouts around technical areas.
- Apply tapes and two coating passes.
- Complete drying between layers.
- Final check after primer, before painting.
Common mistakes, consequences, and solutions
Mistake: neglecting layout
Consequence: multiplication of visible joints and significant waste. Solution: do layout before assembling framework; start with a whole sheet in a strategic corner to distribute joints.
Mistake: hanger spacing too large
Consequence: sagging in the middle of sheets, feeling of softness to the touch. Solution: respect recommended spacing (40-60 cm) and reduce in high-use or heavy load areas.
Mistake: wrong screws
Consequence: heads tearing the paper or loosening. Solution: use screws adapted to support, drill or self-drilling screws as appropriate, uniform tightening.
Mistake: poorly treated joints
Consequence: hairline cracks and poor paint durability. Solution: apply tape correctly, two coating passes respecting drying times, light sanding, primer.
“Most defects reported ten years after installation are due to errors in framework and fixing phases, not finishing.”
Technical report, Building Observatory, 2020
Practical advice for experienced DIYers
If you undertake the installation yourself, organize the worksite in small successive zones. Work in pairs to handle sheets (2.5 m sheets are heavy and fragile). Protect floors and mechanical elements. Test a spot or light location before drilling definitively. And above all, do not hesitate to temporarily secure a sheet to verify its flatness over 24 hours before final screwing.
- Work in pairs for long handling.
- Protect floors and furniture.
- Test assembly temporarily.
- Document steps with photos for reference.
FAQ – Drywall ceiling installation: common questions
1. What thickness of sheet to choose for a ceiling?
For standard ceilings, the 12.5 mm sheet is most common: good rigidity/weight compromise. For large spans, 15 mm sheets exist and improve buckling resistance. If you plan integrated insulation or heavy loads, reinforce the framework rather than systematically increasing thickness.
2. At what spacing should hangers be installed?
Spacing depends on the system: generally 40 to 60 cm. 60 cm in low-stress areas, 40 cm for large ceilings or loads (insulation, ceiling lights). Follow the framework manufacturer’s recommendation to ensure strength and flatness.
3. What type of screws to use for galvanized steel?
Prefer self-drilling screws for galvanized steel, with anti-corrosion coating. They drill and pull the sheet without tearing the head. Avoid standard wood screws on metal framework: they cause play and may wear prematurely.
4. How to avoid cracks around recessed spotlights?
Reinforce the perimeter with additional framework or a batten, apply reinforced tape, and allow expansion gap. Use lightweight spots and provide a metal frame if weight > 2 kg.
5. Can sheets be installed on mixed wood and metal frameworks?
Yes, but ensure connections are stable and spacings compatible. Support points must be homogeneous to avoid differential movement between wood and metal, which causes cracks at joints.
6. What joint compound to use for wet renovation?
In renovation with humidity (bathrooms), use specific water-repellent products and suitable sheets (type BA13 water-resistant). Standard compounds crack under constant humidity; choose ranges recommended by manufacturers.
7. How to fix a false ceiling that is not straight?
If irregularity is slight (< 5 mm), a skim coat may suffice. Beyond that, the framework must be adjusted: adjust hangers, add shims, or redo rails. Effective leveling often requires adjustable hangers and precise elevation.
8. What maintenance after installation?
After painting and complete drying, maintain by regular dusting. In case of microcracks, perform local touch-ups: sanding, light filling, primer, paint. Periodically inspect around technical penetrations (spots, ventilation).
Operational conclusion and recommendation
Here’s the trick: the durability of a drywall ceiling depends more on technical discipline than glamorous finishing. If you respect the framework, adapted screws, good layout, and careful jointing, your ceiling will last decades. For major projects or if your ceiling has constraints (humidity, large spans, heavy lighting), call a qualified professional for the framework. If you DIY, proceed step by step, document, and test flatness before final closure.