
Sommaire
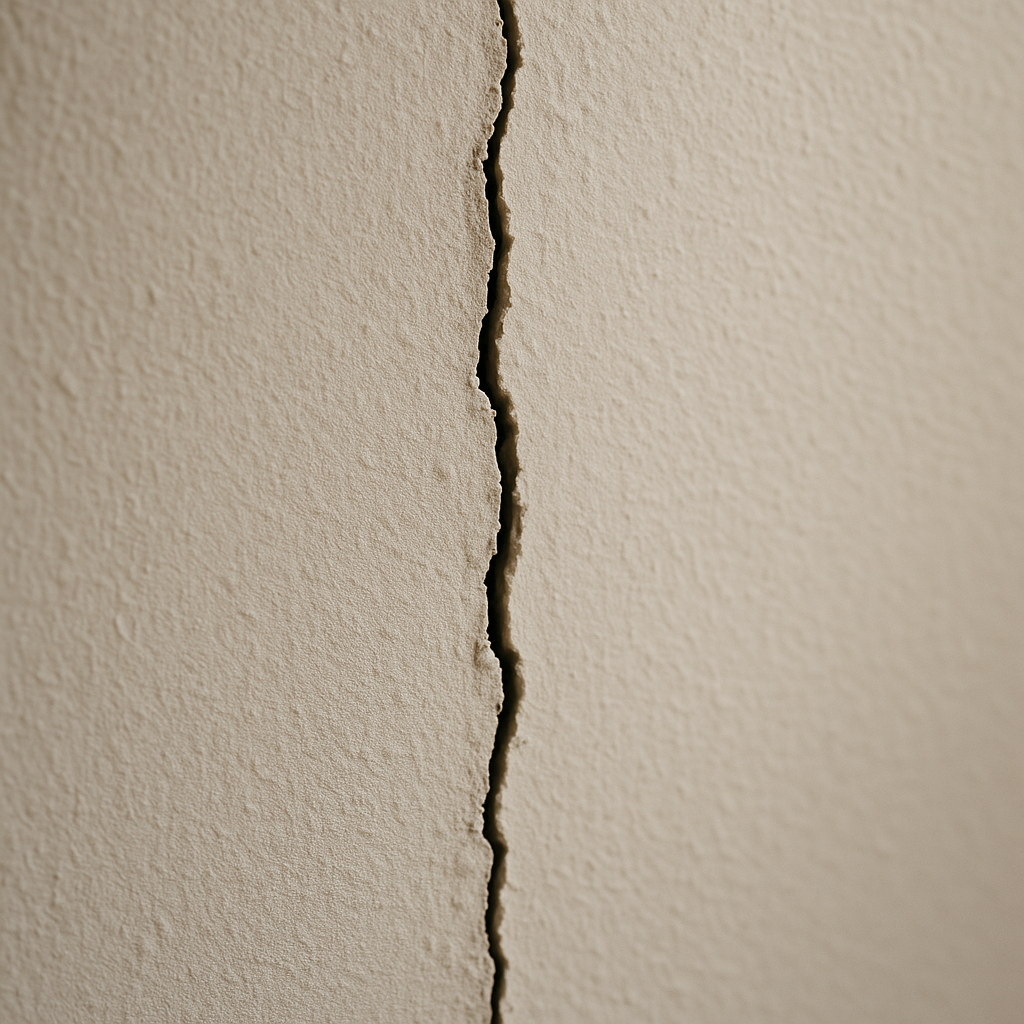
A crack in a wall often raises questions: is it cosmetic or structural? Can you fill it yourself without making things worse? This practical guide takes you from diagnosis to finishing, with clear material choices, detailed operational steps, and advice to prevent the crack from reappearing. No unnecessary jargon: concrete explanations and tested methods so your wall regains a clean and durable surface.
In brief
🔧 Diagnose the crack first: orientation, width, depth, and location determine whether the intervention is cosmetic or structural.
🧰 Essential materials: brush, scraper, suitable filler (putty or patching compound), putty knife, reinforced tape for active cracks.
⚙️ Key steps: slightly widen the crack, dust off, apply a primer if necessary, fill and smooth, sand, paint.
🛡️ Prevention: fix humidity issues, check foundations and joints to avoid movement recurrence or infiltration.
Understanding the crack: quick diagnosis
Before grabbing the trowel, you need to look at the crack from several angles. Its direction says a lot: a vertical crack is often linked to mortar shrinkage or minor settling, while a horizontal crack may indicate a more serious stress (structural movements, lateral pressure). Width is decisive: a gap less than 0.2 mm is generally superficial, between 0.2 and 2 mm requires careful filling, beyond that a professional diagnosis should be considered. Don’t forget depth and environment: signs of moisture, peeling paint, or presence of other nearby cracks reinforce the idea of an ongoing phenomenon.
Signs that require expert evaluation
If the crack widens quickly, crosses several faces of the building, accompanies floor sagging, or affects a lintel, caution is necessary. These signs may indicate foundation problems, structural moisture, or framework issues. In these cases, calling a professional helps identify the cause — and avoid repeated and costly repairs.
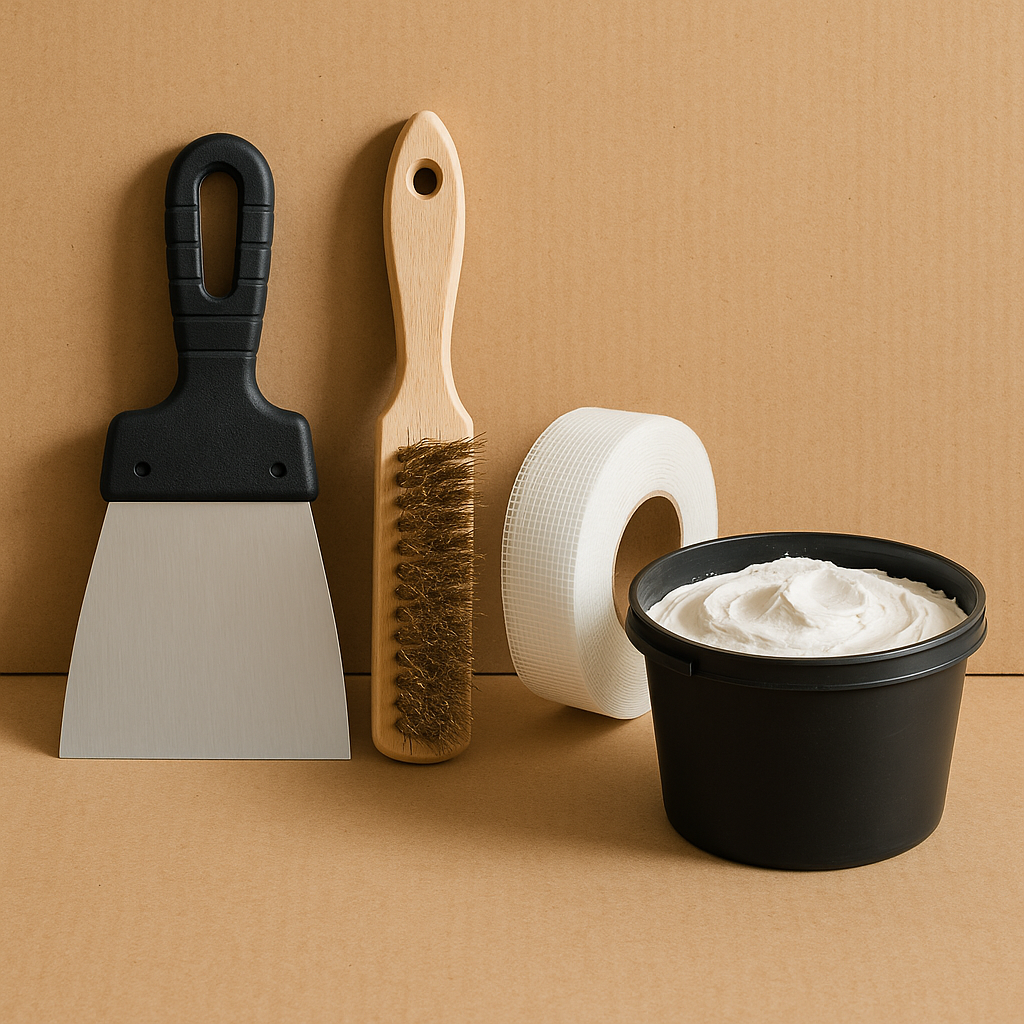
Recommended Materials and Products
Good repair starts with the right materials. A clear list prevents tinkering with an ill-suited product:
- Scraper and chisel to widen and clean the crack.
- Wire brush and vacuum cleaner to remove dust and residues.
- Filler compound (ready-to-use or powder to mix) or acrylic sealant for fine cracks.
- Reinforcing tape (fibers or fiberglass mesh) for movement cracks.
- Putty knife, trowel, and fine sandpaper.
- Primer if the surface is very dusty or porous.
- Finish paint suitable for the surface.
| Product | Use | When to use it |
|---|---|---|
| Filler compound | Fill deep cracks | Cracks > 0.5 mm |
| Acrylic sealant | Finishing and fine cracks | Cracks < 0.5 mm |
| Reinforcing tape | Reinforcement against movement | Active or old cracks with recurring tendency |
Detailed Steps to Repair a Crack
The method varies depending on the nature of the crack, but the following protocol covers most domestic cases.
1. Prepare the area and widen the crack
Start by slightly widening the crack in a V shape using a scraper or a fine disc grinder if you are experienced. This action may seem counterintuitive, but it creates a profile that holds the filler better. Then brush and vacuum to obtain a clean and dust-free edge. If the crack contains crumbling plaster, remove all friable material to reach a sound substrate.
2. Apply reinforcing tape if necessary
For cracks that indicate movement (they reappear after a few months), apply reinforcing tape before plastering: apply a first layer of filler, position the tape by pressing it with the trowel, then cover with a finishing layer. The tape distributes stresses and limits reopening.
3. Apply the filler
Depending on the chosen product, apply the filler in several passes. For deep filling, proceed in layers: a first layer to fill the depth, wait for drying, then a finishing layer smoothed with a knife. The secret to a good repair is to avoid layers that are too thick which crack when drying. For small jobs, an acrylic sealant is sufficient and easier to use.
4. Sand and prepare the finish
Once the filler is dry, sand with fine abrasive to obtain a flat surface. Dust off then apply a primer if the wall is very absorbent. This primer harmonizes porosity and prevents differences in appearance after painting. Finally, paint with two thin coats instead of one thick one: the result will be more uniform and more durable.
Special Cases and Tips
Some situations require adaptation: here are concrete solutions to avoid common mistakes.
Cracks due to humidity
If the crack is accompanied by signs of humidity, filling alone is not enough. You must first identify the source: rising damp, infiltration from outside, poor rainwater drainage. Correcting the humidity (drainage, pipe repair, treatment of rising damp) before reapplying the filler prevents the reappearance of damage and mold growth.
Cracks on old wall with lime plaster
Old walls require compatible materials: use lime plaster rather than cement plaster on an old substrate. Lime remains permeable to water vapor, thus avoiding moisture trapping and rapid deterioration of the repair. It is an act of conservation as much as repair.
Table: type of crack and recommended intervention
| Type | Typical width | Intervention |
|---|---|---|
| Capillary crack | < 0.3 mm | Acrylic putty, paint |
| Shrinkage crack | 0.3 – 2 mm | Filling plaster + tape if necessary |
| Structural crack | > 2 mm | Expert / foundations, technical repair |
Estimated costs and time
A small cosmetic repair job (less than an hour of preparation, several layers of plaster spread over 1 to 2 days) remains inexpensive: a few tens of euros for materials if you buy them individually. A more serious crack, requiring reinforced tape and several interventions or a diagnosis, will increase the cost. In case of structural work, the fees of a BET (technical study office) or a mason can represent a significant budget, but it is an investment that protects the value of the building.
Preventing recurrences
A good repair is accompanied by reflection on the causes. Checking water management (gutters, ground slope), the quality of joints around openings, and the absence of moisture is essential. For cracks related to seasonal variations, favor flexible materials (elastic sealants) and leave an expansion joint if necessary. Regular maintenance — repainting joints, monitoring folds and deformations — avoids costly new interventions.
FAQ
How to know if a crack is dangerous?
A dangerous crack widens, crosses several walls, or is accompanied by subsidence. If you observe a noticeable displacement (doors difficult to close, sagging floors), have a professional intervene for a structural diagnosis.
Can I repair a crack over 2 mm myself?
Theoretically, yes for an aesthetic filling, but it is preferable to get the opinion of a specialist to rule out a foundation or moisture problem. Acting alone without addressing the cause can lead to reappearance.
Which plaster to choose for an exterior wall?
For the exterior, opt for plasters adapted to climatic conditions: classic cement-based plasters for localized repairs or breathable mineral plasters (lime-based) for old walls. Ensure compatibility with the existing substrate.
How long before painting after plastering?
Drying time varies depending on the product and applied thickness: generally 24 to 48 hours for a thin layer, longer if the plaster is thick or if ambient humidity is high. Follow manufacturer recommendations.
Is reinforced tape indispensable?
Not always. It is recommended for cracks subject to movement (thermal or structural). For purely aesthetic and stable cracks, a well-applied plaster is sufficient.
{
“@context”: “https://schema.org”,
“@type”: “WebPage”,
“about”: {
“@type”: “Thing”,
“name”: “Repairing a crack in a wall”
},
“keywords”: [“wall repair”, “wall crack”, “wall plaster”, “cracked walls”]
}