
Sommaire
Motorizing a gate combines comfort and security. Whether it is a swing or sliding gate, automation makes daily life easier while enhancing your home. However, between choosing the system, preparatory work, and technical adjustments, many details can escape you. Follow this guide to successfully complete each phase of the project, from the foundations to commissioning.
In brief
🔧 Preparation: earthworks, concrete foundations, and precise marking of the pillars are essential to ensure the longevity of the mechanism.
⚙️ Types of motorization: articulated arm, rack and pinion, or underground motor offer different performances. The choice depends on space, design, and budget.
📐 Step-by-step installation: motor mounting, electrical adjustments, and synchronization with remote controls require rigor, plans, and compliance with safety standards.
🛠️ Maintenance: lubricating joints, checking stops, and verifying sensors ensure smooth operation for years.
Why motorize your gate?
Converting a manual gate into a motorized installation changes the daily routine. No more trips in the rain to open or close it; just a simple press on the remote control or smartphone app. Beyond comfort, this automation enhances security: more reliable locking, integrated lighting, and the possibility to record entries. Not to mention the added real estate value represented by a so-called “connected home” device.
The different types of motorization
Choosing the right technology starts by understanding the specifics of each mechanism. Light or heavy, swing or sliding, your gate will inevitably dictate the most appropriate motorization model.
Electromechanical motorization
It relies on a geared motor powered by low voltage (230 V). Easy to install and often more economical, it is the most common option for standard gates. However, it can be noisy if the stop adjustments are not perfect.
Hydraulic motorization
The hydraulic system uses a pressurized fluid for smoother and quieter movement. Ideal for heavy gates or frequent openings, it requires a higher initial investment and slightly more precise maintenance (checking seals, oil level).
Underground motorization
Completely invisible, the motor is installed under the threshold. The gate’s aesthetics are not altered and security is enhanced. The work is more complex (trenching, waterproofing) and the budget increases accordingly.
| Type | Advantages | Disadvantages | Average budget |
|---|---|---|---|
| Electromechanical | Easy to install, affordable | Noisy | 500–1,200 € |
| Hydraulic | Quiet, powerful | More frequent maintenance | 1,200–2,500 € |
| Underground | Discreet, secure | Heavy construction work | 1,800–3,000 € |
Site Preparation
First of all, the ground must be perfectly leveled. A trench is dug to pour a reinforced concrete footing, firmly anchoring the posts. This base ensures that the gate does not deform under the forces of the motor.
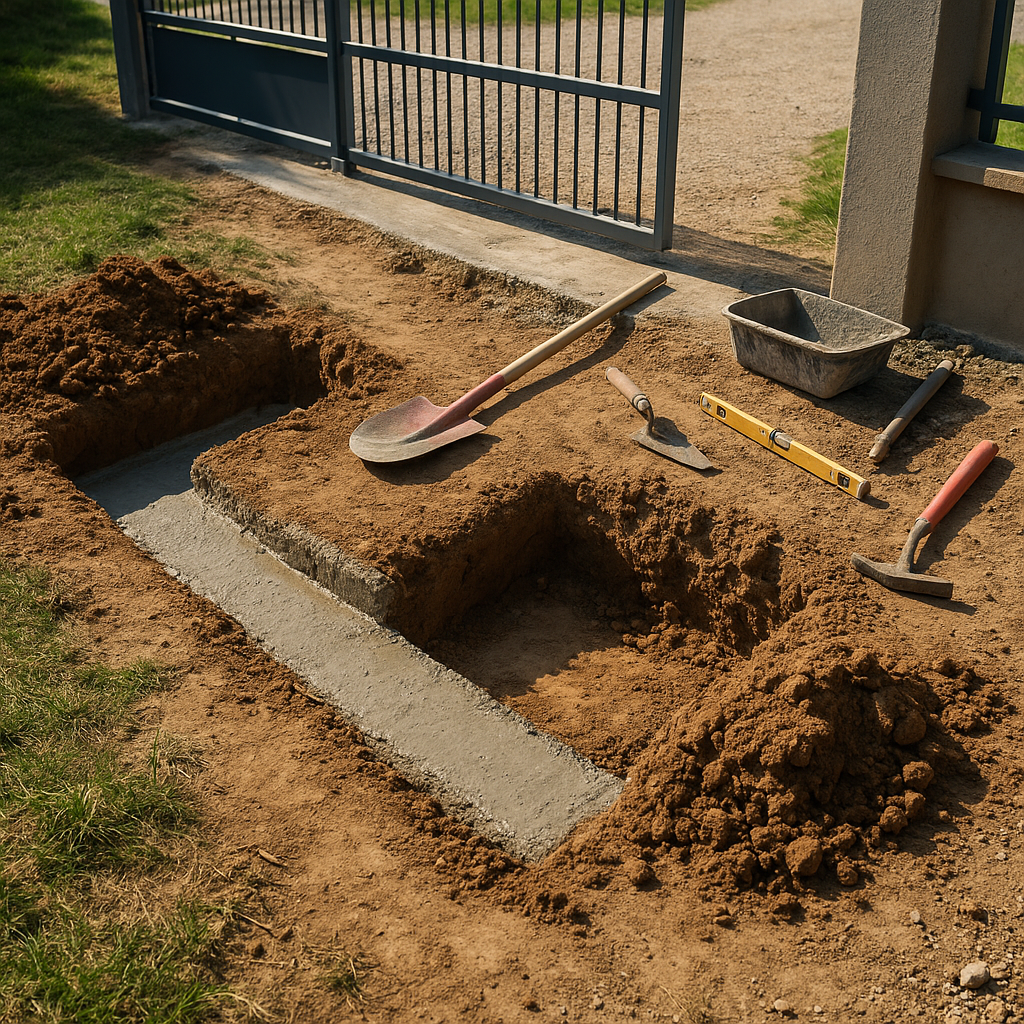
Millimetric precision for alignment is crucial: poorly shimmed pillars cause jerks and premature wear of the mechanism. Do not hesitate to use a plumb line and a laser level to validate each reference point.
Step-by-step Installation
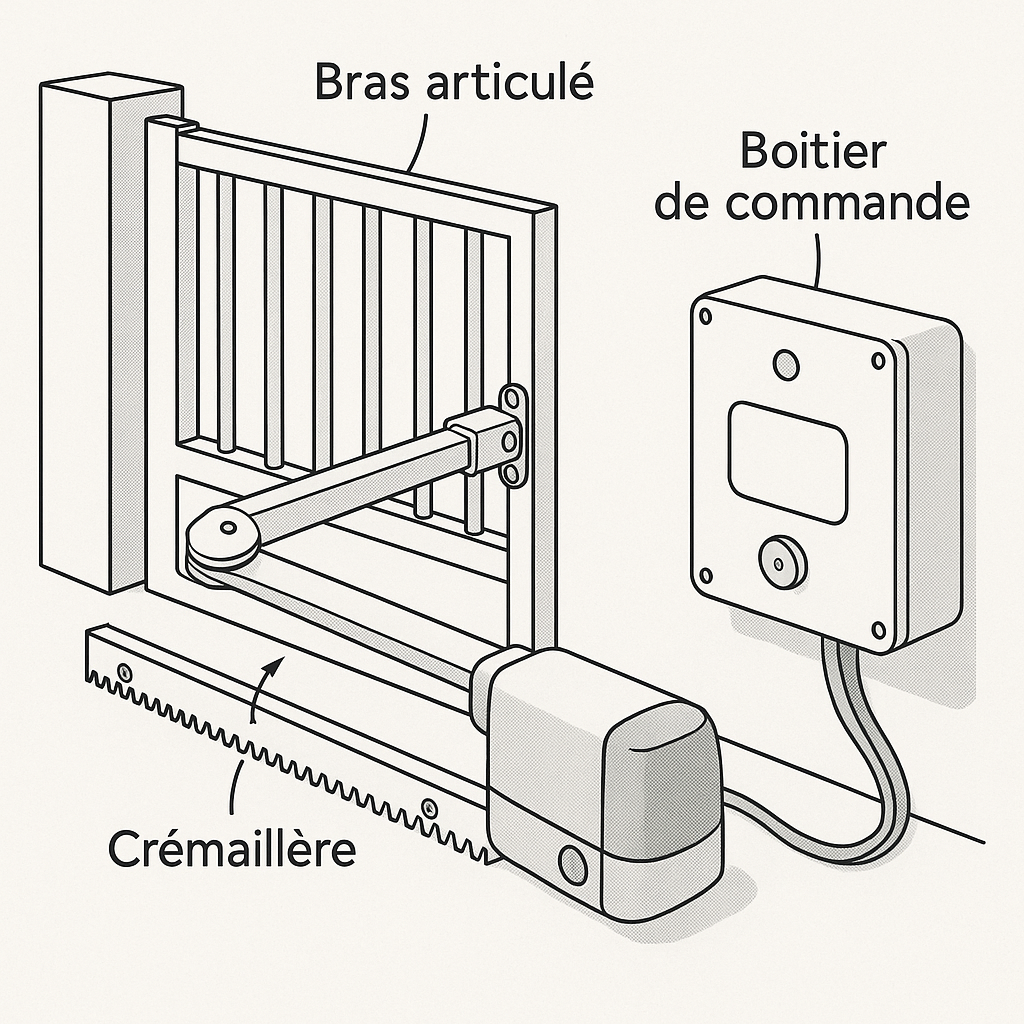
1. Fixing the motor and articulated arm
Position the motor according to the supplier’s plan, respecting the indicated range of motion. For a swing gate, the articulated arm is attached to the gate leaf using suitable plates. The holes must be pre-drilled to avoid weakening the structure.
2. Electrical connections
The power supply is ideally connected to a circuit protected by a 30 mA differential circuit breaker. The sheathed cable (H07RN-F or equivalent) passes through a conduit to reach the control box. Strictly respect the polarity and wiring diagrams.
A dry run test (without the gate) allows verification of the rotation direction and speed before proceeding to full assembly. This step avoids later disassembly in case of inversion.
3. Adjustments and safety
Program the mechanical or electronic stops to define the opening and closing travel. Then, install infrared photocells and safety hinges to prevent any crushing. Good adjustment must combine smoothness and responsiveness.
Maintenance and servicing
A motorized gate without follow-up can become noisy or experience premature failures. Once a year, lubricate the joints (silicone or copper grease), clean the racks, and check the sealing of the electrical boxes.
- Check the tension of the springs (swing gates).
- Test the operation of the cells and detectors.
- Visually inspect the condition of the cables and the box.
In case of jittering (jerks) or frequent errors, it is better to quickly diagnose the source (power supply, connection, sensors) rather than forcing the motor.
Cost and Budget
The overall price includes the material, installation, and sometimes the programming of a remote control or an intercom. It varies greatly depending on the chosen technology and the provider.
| Item | Unit Price | Comments |
|---|---|---|
| Electromechanical motorization | 500–1,200 € | Basic to high-end models |
| Supply of the gate | 1,000–3,000 € | Wood, PVC, aluminum… |
| Professional installation | 300–800 € | Depending on the complexity of the site |
| Accessories (photo cells, remote controls) | 150–400 € | Complete pack or individual |
FAQ
What is the maximum distance for a motorized sliding gate?
Most systems support a length of up to 6 m. Beyond that, reinforced rails and a more powerful, even hydraulic, motor are required.
Can an already installed gate be motorized?
Yes, provided that the structure is sound and the pillars can accommodate the motor. A preliminary check by a professional avoids surprises.
What electrical supply should be planned?
A dedicated circuit, protected by a 16 A circuit breaker and a 30 mA differential, is essential. The cable must comply with outdoor standards (H07RN-F or equivalent).