
Sommaire
Creating a Vegetable Garden on a Balcony: Easy Vegetables, Containers, and Watering
Yes, a balcony vegetable garden can produce radishes, lettuces, herbs, strawberry plants, and cherry tomatoes. First, measure the space, observe the light and wind, then set up pots or planters with drainage holes, filled with suitable potting soil. Watering based on the actual moisture of the substrate prevents both excess and neglect.
This guide accompanies each step: balcony safety, choosing easy vegetables, pot depth, drainage, installation, watering, and maintenance. The indicated dimensions are practical guidelines to be adjusted according to the variety, region, season, the balcony’s load capacity, and the producer’s recommendations.
In Brief
🌱 Start small: a few stable containers are easier to monitor than a fully packed balcony.
☀️ Adapt crops to the light: cherry tomatoes and thyme enjoy a sunny spot, while lettuces, parsley, and chives tolerate less sunny exposure.
💧 Drainage comes before watering: each pot must drain water without letting roots soak in a full saucer.
⚠️ Weight and fixings cannot be guessed: the allowable load depends on the balcony structure and must be checked before installing large containers.
Check That the Balcony Can Accommodate a Vegetable Garden
A balcony vegetable garden is a container growing setup that must remain compatible with light, circulation, safety, and the building’s structure. Before buying pots, measure the available length and width, identify bright areas, and note spots exposed to wind or water splashes.
The first check concerns the total load of containers filled with moist soil, not the weight of the empty pot. A terracotta planter, a wooden box, and several bags of soil can quickly become heavy. There is no general value allowing installation on all balconies: consult the building’s technical documents, the condominium regulations, or a qualified professional if in doubt.
A balcony vegetable garden must be designed as a stable and accessible installation, not just a simple collection of pots.
Condominium rules may regulate hanging planters, objects placed on railings, and drainage towards neighbors. Prefer pots placed on the floor, against a wall when the layout allows, without blocking a door, drainage, or passage. Containers must remain accessible for watering, leak inspection, and moving in case of strong wind.
Adapt Crops to the Exposure
The amount of available light guides plant choice, but an orientation alone does not precisely describe a balcony. Observe sunlight at different times of day and consider walls, neighboring buildings, the season, and heat reflected by facades.
- In the brightest area, place cherry tomatoes, strawberry plants, radishes, and sun-loving herbs like thyme.
- In less exposed spaces, try lettuces, arugula, parsley, and chives.
- For sowing and planting, consult the seed packet or plant label and consider the last frosts in your region.
- Do not apply the same growing calendar across all of France: planting dates vary according to local climate and season.
Secure Pots and Water Drainage
Avoid heavy containers suspended or placed on a railing without a fixing system designed for this use. A planter that tips over poses a risk to people below, while repeated drainage can damage the facade or disturb a neighbor.
Place a saucer or catch tray under the pots, then empty excess water when it accumulates. Slightly elevate containers to allow holes to function and keep visual access to check for leaks. The supports must be stable, moisture-resistant, and suited to the pot’s shape.
Choosing Easy Vegetables for a First Container Garden
Easy vegetables for a balcony are compact crops, suitable for container growing and relatively simple to monitor. Radishes, young shoots, lettuces, herbs, strawberry plants, and cherry tomatoes allow for combining quick harvests with plants that occupy the pot longer.
The safest choice is to combine a few fast-growing crops with one or two more demanding plants. Dwarf, compact, or explicitly pot-destined varieties limit space usage, while sprawling squashes, fruit trees, and very large vegetables require space that the balcony cannot always provide.
Easy and Fast Vegetables
- Radishes: they fit well in a shallow planter and can be sown directly.
- Cutting lettuces, arugula, and young shoots: staggered sowing helps avoid a concentrated harvest period.
- Dwarf beans: choose a sufficiently deep container and a location protected from gusts.
- Cherry tomatoes: favor a compact variety, a deep pot, a bright exposure, and install a stake at planting time.
Herbs and Strawberry Plants
Basil, chives, parsley, and thyme suit many balcony gardening projects, provided their location and watering are adjusted. Herbs do not all have the same needs: thyme generally prefers a substrate that does not remain waterlogged, while basil requires more regular monitoring during hot weather.
Strawberry plants can be grown in a well-drained pot or planter. Avoid pairing them with a plant whose water needs are very different. An invasive or very sun-demanding herb often benefits from staying in an individual pot.
Sow or Buy Seedlings?
Radishes, lettuces, arugula, and some herbs can be sown directly in their container. This option is usually cheaper and allows staggered crops, but requires monitoring germination and soil moisture.
Cherry tomato seedlings save time at the start of the season. Choose stocky, healthy plants without spotted leaves and suitable for the planting period. A very developed seedling is not automatically a better choice: it may have suffered during transport or lack root space.
Choosing Containers, Soil, and Drainage
The right container corresponds to root development, acceptable weight on the balcony, and ease of maintenance. A pot, box, planter, or grow bag is suitable if the support remains stable and water can drain through functional holes.
Vegetable garden soil must be fertile, light enough, and capable of retaining some water without remaining constantly soggy. Adding compost can enrich the substrate, but the volume of wet soil must always be considered in the total load of the installation.
What Depth for Each Crop?
| Crop | Indicative Depth | Suitable Container | Points of Attention |
|---|---|---|---|
| Radishes | About 15 to 20 cm | Shallow planter | Thin out seedlings and monitor drying out |
| Young shoots and lettuces | About 15 to 20 cm for young harvests | Planter or light box | Follow variety instructions |
| Herbs and strawberry plants | About 20 to 30 cm | Well-drained pot or planter | Avoid pairings with incompatible water needs |
| Cherry tomatoes and dwarf beans | Rather 30 cm or more depending on the variety | Deep and stable pot | Provide a stake and check the weight of the wet substrate |
These depths are guidelines, not universal standards. Variety, pot shape, and producer recommendations can alter the necessary volume. An unnecessarily large container increases the load without automatically improving the crop.
Comparing terracotta, plastic, wood, and grow bags
- Terracotta: stable and breathable, but heavy and more prone to drying out.
- Plastic: light and practical, with special attention to heat on a very exposed balcony.
- Wood: suitable for boxes, provided you choose a durable, stable structure with effective drainage.
- Grow bag: light and practical, but must be placed in a stable support that protects the floor from runoff.
Preparing the bottom of the pot and the substrate
Before filling a planter, check that the holes are not blocked. A layer of clay pellets or gravel can be used depending on the container’s configuration, but it does not replace drainage holes or suitable potting soil. The drainage function depends on the entire system.
Leave a few centimeters free at the top of the pot to water without overflowing the substrate. After planting, a light mulch can limit evaporation. The mulch should not cover the plant collar nor maintain stagnant moisture.
Effective drainage starts with clear holes and suitable substrate; a mineral layer does not fix a poorly designed pot.
Installing the vegetable garden on the balcony step by step
Setting up a vegetable garden on a balcony requires progressive organization: placing pots, preparing substrate, planting, staking, then watering. The following method limits unnecessary movements and allows quick identification of problems with stability, light, or drainage.
- Measure the available surface and mark bright areas, less exposed spots, and very windy zones.
- Place empty containers to test circulation, stability, and access to water.
- Add substrate to the pierced pots, leaving a few centimeters free at the top.
- Install tall crops at the back, then lettuces, radishes, and low herbs in front.
- Place stakes at planting, water gently, and check drainage.
Organizing pots according to light and wind
Place cherry tomatoes, strawberry plants, and sun-loving herbs in the brightest area. Lettuces, radishes, parsley, and young shoots can occupy less exposed spaces, depending on the season and the needs of each variety.
Tall plants should not shade low crops. Also avoid very windy edges for newly planted seedlings. Grouping pots can reduce their direct exposure to wind, but leave enough space to water, harvest, and allow air circulation.
Planting without overloading containers
Respect the distances indicated on seed packets and plant labels. An overcrowded planter becomes difficult to water and encourages root competition. A cherry tomato can possibly share a large pot with some low herbs, only if the available volume allows it.
Water gently after planting to bring the substrate into contact with the roots. Violent watering can displace seeds, uproot a young plant, or cause soil-laden runoff onto the balcony floor.
Planning stakes, mulching, and protection
- Stake cherry tomatoes as soon as they are installed with a soft tie that does not squeeze the stem.
- Use a fine, airy mulch without covering the collar.
- Move or protect pots in case of strong wind, late frost, or exceptional heat.
- Check the overall stability after heavy watering and after each windy episode.
How to successfully water potted plants?
Successful watering means checking the substrate moisture before adding water, then watering slowly at the base until slight runoff occurs. Frequency varies depending on pot size, wind, weather, temperature, the plant, and its growth stage: a fixed dose does not suit all crops.
The right signal is not the calendar, but the actual condition of the soil beneath the surface. Insert a finger or a small tool into the substrate, observe the pot’s weight, and check moisture under the mulch before deciding. Empty the saucer if water remains there for a long time.
Recognizing a Lack or Excess of Water
| Observation | Possible Cause | Cautious Action |
|---|---|---|
| Soil dry deep down, wilted leaves, very light pot | Probable lack of water | Water slowly at the base and check drainage |
| Soil constantly moist, stagnant smell, yellowing leaves | Excess water or insufficient drainage | Check holes, empty the saucer, and space out watering |
| Dry surface but moist substrate underneath | Surface evaporation or mulching | Do not water automatically; check deeper |
| Small pot very light after a windy day | Accelerated drying out | Check more often and move the pot if necessary |
Managing Absences and High Heat
Group the pots in a bright but less scorching area, then add a light mulch if the substrate remains sufficiently draining. A water reserve or drip system can help, but its flow rate must match the volume of the containers and the plants’ needs.
Test the device several days before an absence. Check for leaks, flow, and the actual amount delivered. During a prolonged heat period, ask someone to check the plants when the situation cannot be monitored remotely.
Maintaining Crops and Harvesting Gradually
Maintaining a container vegetable garden relies on regular observation rather than systematic interventions. Examine the leaves, substrate, stakes, and container stability each week, then adjust watering, exposure, or support as soon as a problem appears.
Small containers deplete faster than open ground soil, but fertilizing is not automatic. Consider the freshness of the soil, the length of cultivation, and the plant’s condition before using fertilizer for vegetables or tomatoes. Follow the instructions and do not fertilize a dehydrated or freshly repotted plant without checking its condition.
Feeding Plants in Containers
- Wait until the new soil has been used for part of the cultivation before considering fertilization.
- Choose a product suitable for the vegetables grown and follow the dose indicated on the packaging.
- Avoid overdosing: a small volume of soil quickly concentrates inputs.
- Prioritize correcting watering, light, or drainage first when a plant slows down.
Harvesting the First Crops
Cut lettuces and herbs gradually to keep parts capable of regrowing. Harvest radishes when they have reached a sufficient size, then regularly pick ripe cherry tomatoes and beans.
Remove severely damaged leaves and diseased fruits to maintain good aeration. Regular harvesting also prevents vegetables from passing their pleasant consumption stage.
Harvesting a little and often allows you to monitor the condition of the plants while avoiding overloading the containers.
Example of a vegetable garden for a small balcony
An initial setup can remain light, scalable, and easy to water. The example below is not a universal plan: adapt the number of containers to the allowable load, exposure, actual available space, and the time you can devote to the plants.
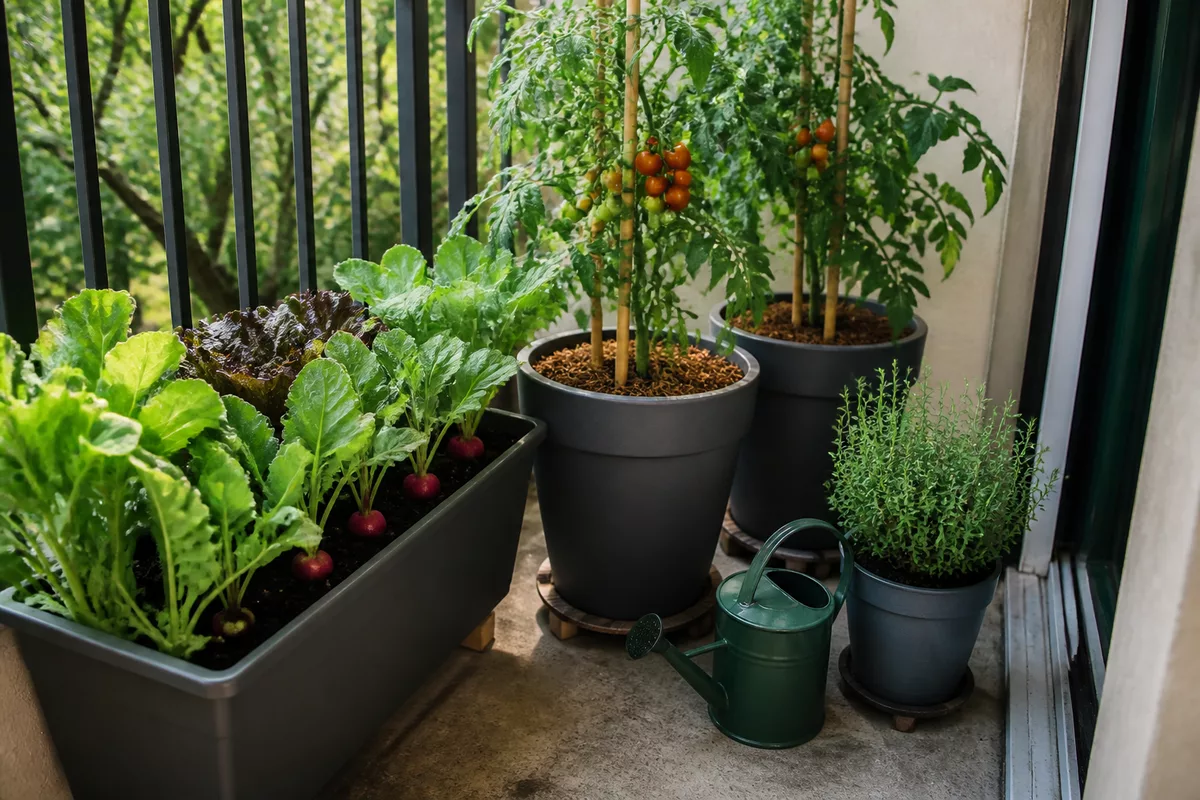
A simple composition to start
- A planter box about 15 to 20 cm deep for radishes, arugula, or young shoots.
- One or two deep pots for compact cherry tomatoes, with stakes.
- A pot dedicated to parsley, chives, or basil depending on exposure.
- A planter box or pot for strawberry plants, with controlled drainage.
- A grouping near a water point, without blocking circulation.
The list of essential equipment
| Equipment | Use | Check before purchase |
|---|---|---|
| Perforated containers | To hold the crops and drain water | Stability, clear holes, and total weight |
| Potting soil | Feed the plants and retain some moisture | Intended use for vegetables or container growing |
| Saucers and mulching | Limit runoff and evaporation | Do not keep roots in water |
| Watering can with fine rose | Water without displacing seeds or substrate | Practical access between pots |
| Stakes and soft ties | Support tomatoes and tall plants | Wind resistance and no tightening |
| Seeds or seedlings | Choose crops according to season and light | Compact variety and producer recommendations |
Frequently asked questions about balcony gardening
Which vegetables are easiest to grow on a balcony?
Radishes, lettuces, arugula, young shoots, chives, parsley, strawberry plants, and cherry tomatoes are good choices to start with. Compact varieties adapted to container growing take up less space than sprawling squashes or very large plants.
Can you create a garden on a shaded or semi-shaded balcony?
Yes, some crops tolerate less intense light, notably lettuces, arugula, parsley, and chives. Production may be more limited depending on exposure, season, and neighboring buildings; observe the actual light before choosing sun-loving tomatoes or herbs.
What pot depth is needed for cherry tomatoes, lettuces, and radishes?
A depth of about 15 to 20 cm can suit radishes and young shoots. Mature lettuces, herbs, and strawberry plants often require about 20 to 30 cm, while cherry tomatoes need a deep container, often around 30 cm or more depending on the variety and producer’s instructions.
Which potting soil to choose for container gardening?
Choose soil intended for vegetables or container growing, fertile, light, and able to retain water without becoming waterlogged. Compost can complement the substrate but does not replace functional drainage and increases the container’s weight when wet.
How to know when to water plants in a balcony garden?
Test moisture below the surface with a finger or small tool, then observe the pot’s weight and the condition of the leaves. Water slowly at the base when the substrate is truly dry at the useful depth, without applying the same frequency to all crops.
How to prevent water from draining onto neighbors?
Use saucers or catch trays, slightly elevate pots, and check drainage holes. Empty accumulated water and water gradually to immediately spot any leaks or overflow.
How to water a balcony garden during an absence?
Group pots in a bright area less exposed to heat, mulch lightly, and test a water reserve or drip irrigation before leaving. A trusted person should check the plants during a prolonged absence or heatwave.
Can you install a garden on any balcony?
No, the structure, allowable load, condominium rules, fixings, and fall risks must be checked. When in doubt, limit heavy containers and seek technical advice before installing large boxes or hanging planter boxes.
Key Takeaways
- 🌱 Start with radishes, lettuces, herbs, strawberry plants, or compact cherry tomatoes.
- ☀️ Choose plants according to the actual light received by each area of the balcony.
- 🪴 Use containers that are pierced, stable, and proportionate to root development.
- 💧 Check the substrate moisture before each watering and avoid stagnant water.
- ⚠️ Check the load, fixings, co-ownership, and drainage before installation.